Last updated on December 16, 2015
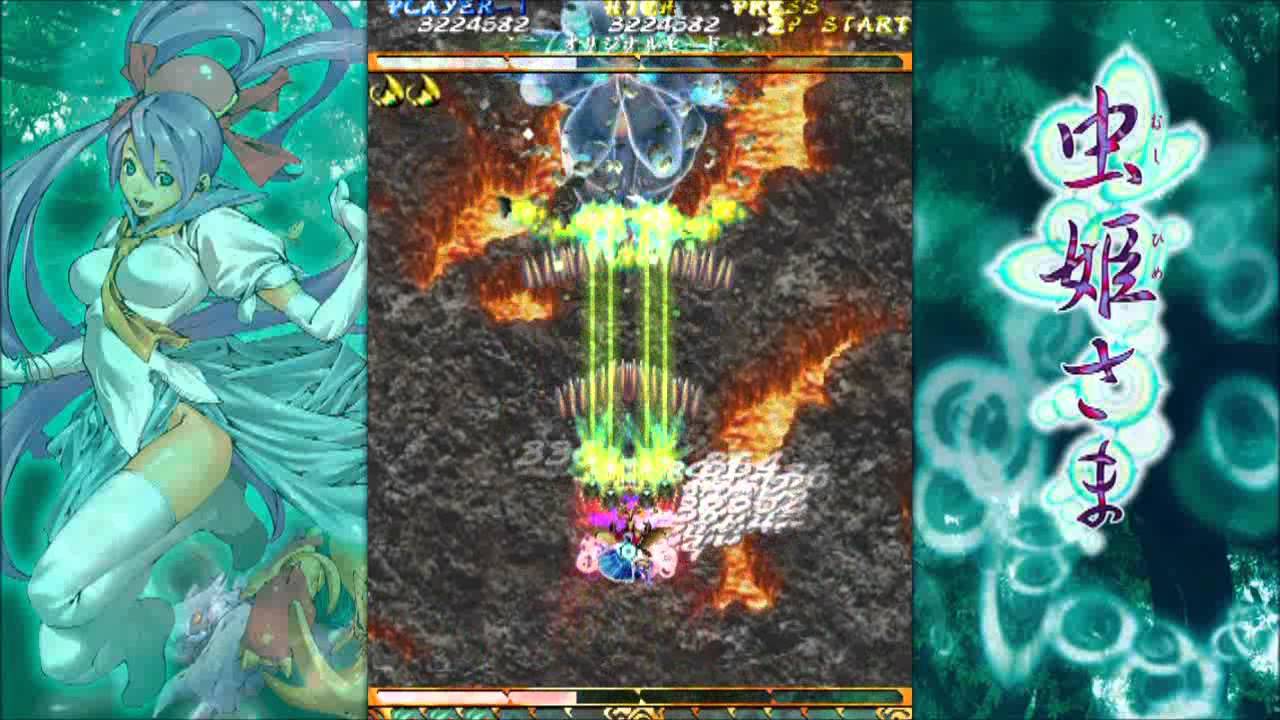
That said, Mushihimesama does not requires jittery, erratic motions to avoid its myriad obstacles; rather, you need to know your options, your buttons, and your hitbox. The game only gives you three buttons: Shot, Bomb, and Rapid Fire. The Shot button provides your typical Shmup shot, which fires in one of three ways depending on your initial choice. Each choice gives your beetle a different range of motion, fire radius, and power level; S-Power (the S stand for “straight”, I assume)allows the animal under your control to move the fastest and the shot takes out enemies the fastest, but it also has the narrowest shot range; contrast that with W-Power (“wide”), which gives you the largest firing radius, yet the least powerful shot and attack speed. All of these choices present different strategies for each stage, based on your personal preferences, since movement and shot type often dictate how you can approach the stages. I recommend trying them all, then sticking with one in particular so that you get a good feel for it.
Pressing and holding the Shot button will slow down your beetle friend, which fires your Shot of choice in a concentrated rate directly ahead and also reveals a shining light directly in the middle of your player character. For the uninitiated, this is your “hitbox”, the area which a bullet needs to hit in order for your to die. You will need to know this intimately, as this information allows you to graze bullets and avoid death where you would seemingly die. Of course, the burden of that knowledge, combined with enemies pouring into the screen from the top, means you must precariously balance a view of your craft with anticipation of enemy bullets; thus, the indicator gives practical information and allows players to eventually get a “feel” for their vulnerable areas.
The Bomb is your typical life-saving device. You obtain additional bombs via certain craft that drop from certain enemies, and also from dying. Bombs in danmaku shooters simply exist to clear the screen of bullets, and Mushihimesama is no exception. It does work in a fairly strange way, however; usually such weapons destroy all enemies on screen, but Mushihimesama’s version only hits a particular area. As well, the bomb’s target area is determined by where you move your ship; if you fly forward while activating, just for example, it will land ahead of you, in contrast to simply pressing the button. Thankfully, it doesn’t seem like using bombs is a huge detriment to your score, but it can save your chain or your run from the loss of a life.

To elaborate on the Bomb drops, certain enemies drop Shot upgrades and Bombs, as well as Options. If you’ve ever played Gradius or R-Type, you might remember the small orbs that follow or block your ship from enemy fire; Options in Mushihimesama work in a similar way, specifically the Trace version. A few tiny bugs will fire lasers along with your ship, in a trail following your main beetle. The Formation Option, on the other hand, puts the Options in place around your ship, which lets you keep a set, wide radius of fire. Both are equally useful, and some of the choices come down to strategy and/or whatever’s available. When the Option power up appears, you can actually wait for the Option of choice (there’s a small timer on the outside of the power up), although that isn’t always practical. This same timer allows the Shot upgrades to change, meaning you can obtain the other Shots even if you picked a different one (dying will revert back to the original one you chose at the beginning).
Lastly, the Rapid Shot lets you fire your normal Shot without slowing down or revealing the hitbox; thus, you can fire at enemies while moving at normal speed if you so choose. Due to a glitch in the way the Shot/Rapid Shot works, you can also hold Rapid Shot while tapping Shot to use the “super shot”; this, for whatever reason, causes enemies to take at least double damage from your shot button, which is essential for the whole game! You’ll also need this trick for the more elaborate scoring techniques of the more difficult modes (which I will describe in detail later) I recommend an arcade joystick, but a modern controller with triggers works just as well (I personally tried the game with an Xbox 360 controller, and it’s perfectly viable).
Mushihimesama’s home port (at least the Steam and Xbox 360 versions) also contain a pleothera of modes, based on your particular skill level and preferences. The arcade version of the game contains three different modes: Original, Maniac, and Ultra. Original is a simply survival mode which contains mostly aimed bullets; you obtain high scores by holding as many lives as possible until the end of the game, where each one offers a 10,000,000 score bonus. Getting to that point without losing a life, however, is still a challenge! At 2.5 million and 5 million score alike, the game provides a score extend, and there’s one additional hidden extra life for a total of five lives for the entire game. Most players start at Original, and it’s certainly approachable.
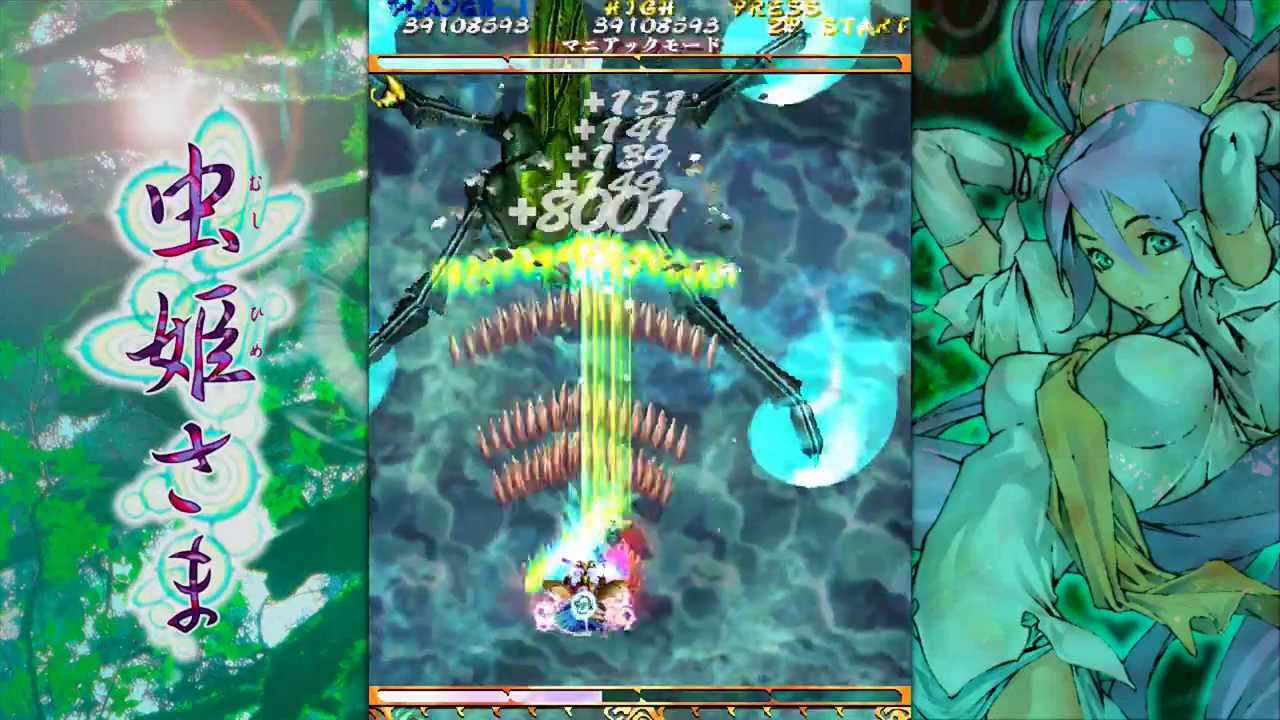
Maniac and Ultra point towards greater challenges, both for bullet density and scoring. Both modes use a chain counter system, similar to DoDonPachi: Daioujou but slightly different. Hitting enemies with any sort of shot increase the hit counter, and failing to do so makes the counter fall. The higher the counter, the more points each enemy is worth; as well, the faster you defeat enemies, the more points they are worth. Thus, in a way, you basically have to memorize a specific route to obtain the highest scores (I also believe killing enemies at point blank range gives you additional health, although I’m not one hundred percent sure). Add in the “super shot”, which allows you to drop and reapply the chain with the right timing, and the scores in Maniac can skyrocket to the 2 billion point mark! Honestly, I am not one for complete memorization, but I can see the appeal of this scoring system. As for the difficulty of Maniac, the mode shouldn’t provide much of a greater challenge than Original.
Ultra, on the other hand, will test the mettle of even the best STG players. In the English version, the game ask “Are you ready to face sheer despair?”, with red warning labels and a yes/no choice before you pick it! Once you do, though, you’ll see why CAVE put that warning – due to the new arcade hardware at the time, Mushihimesama was something of an experiment to see how many bullets CAVE could place on screen. As such, Ultra contains thousands of bullets on-screen, with intricate, dense patterns that require the tiniest of micro-adjustments to survive under limited space constraints. It seperates the men from the boys, and just completing it (let alone scoring!) is an achievement in itself – one that seems possible, if requiring dedication!
Note: these are the modes that come with the original game, but there’s also an alternate Arrange mode and the much-coveted 1.5 Matsuri DLC. Even so, I am merely reviewing the game itself, so these can be covered at the later time.